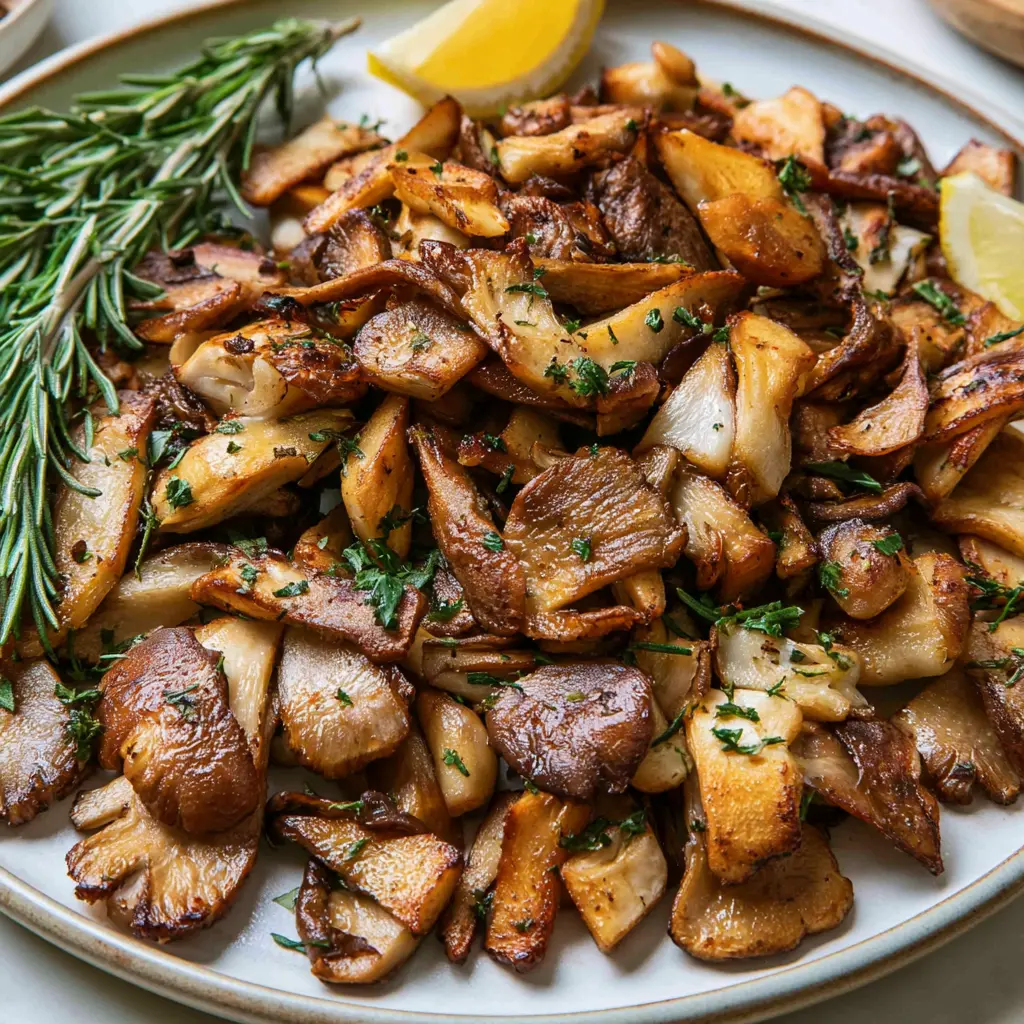
Crispy Sauteed Oyster Mushrooms with Rosemary Butter
Ingredients
Method
- Clean and trim the oyster mushrooms, pulling apart any clusters into individual pieces. Tear any mushroom larger than 3 inches into smaller, bite-size pieces and pat dry with paper towels. Set a large plate lined with paper towels nearby.
- Heat a large stainless steel skillet over medium-high heat and add enough neutral oil to coat the bottom. When the oil shimmers, use tongs to place the mushrooms in a single even layer, working in batches if needed. Leave them untouched for at least 2 minutes, then flip one mushroom to check the color. If it is deeply golden brown, flip the rest and cook for another 2 to 3 minutes until both sides are crispy. Transfer the mushrooms to the paper towel-lined plate and season generously with salt and pepper. Repeat with the remaining mushrooms, adding more oil as needed, then turn off the heat. Use visual cues rather than time since stovetops vary.
- Wipe the skillet clean, set it over medium-low heat, and add the butter and rosemary sprig. Once the butter melts, return all the mushrooms to the skillet and toss for 1 to 2 minutes until they are glossy and coated. Season again with salt and pepper.
- Remove the skillet from the heat, transfer the mushrooms to a serving plate, and serve right away with a squeeze of fresh Meyer lemon over the top.
Nutrition
Notes
Tried this recipe?
Let us know how it was!Why This Recipe Works
You’ve seen those weird, frilly mushroom clusters at the market and walked past them three times. Today, we fix that. These sauteed oyster mushrooms are the quick, golden, butter-tossed side dish you didn’t know you needed.
Here’s the thing, though. My first attempt at making them was genuinely tragic. I’m talking grey, sad, rubbery slugs floating in a puddle of mushroom juice. It was so disappointing that I almost gave up on them completely.
But then I figured out the secrets. High heat. A single layer in the pan. And a seriously hot skillet. That’s it. That’s the whole game. When you get it right, the frilly edges turn unbelievably crispy, like the best parts of a perfect sear, but make it plants.
This recipe uses just a handful of ingredients, takes about 20 minutes from start to finish, and delivers serious restaurant-quality results. It’s the kind of easy mushroom sauté that feels fancy but is actually foolproof.
How to Buy and Store Oyster Mushrooms
Before we even think about cooking, we need to talk about shopping. Good fresh oyster mushrooms make all the difference, and picking them out is easier than you think.
- Feel for firmness: They should feel springy and dry, never slimy, wet, or rubbery.
- Check the smell: They should smell clean and earthy. If they smell fishy or sour, leave them at the store.
- Look at the color: Vibrant, creamy tones are a good sign. Avoid any with dark, mushy spots.
- Size matters: Smaller clusters are often more tender, but larger ones are great for tearing into pieces.
Once you get them home, storage is key. I know it’s tempting to keep them in the plastic container they came in, but trust me, they need to breathe. Pop them in a paper bag, loosely close it, and store them in the fridge’s produce drawer. They’ll stay happy for 3 to 4 days.
How to Clean and Prep Oyster Mushrooms
Okay, the cardinal rule of how to cook oyster mushrooms: Do. Not. Rinse. Them. I know, I know, it feels wrong not to wash your produce. But oyster mushrooms are like tiny sponges, they soak up water so fast.
And what happens when they’re full of water? They steam instead of sear. That’s exactly how you end up with those rubbery, grey slugs I mentioned earlier. We’re not doing that today.
Instead, here’s the right way to clean them:
- Take a soft pastry brush or a damp paper towel and gently wipe off any dirt or debris.
- If they’re really dirty, you can give them a super quick rinse and pat them completely dry immediately, but wiping is always better.
- Trim off the woody central stem at the base. It’s tough and chewy compared to the delicate caps.
- Tear the clusters into individual pieces. Any mushroom larger than 3 inches should be torn into smaller, bite-size pieces.
This mushroom cleaning technique keeps them dry and ready to get beautifully golden brown when they hit the heat.
Ingredient Notes and Substitutions
One of the reasons I love this recipe so much is because the ingredient list is beautifully short. Every single element earns its place.

- Fresh Oyster Mushrooms: They’re the star of the show. Their texture is unmatched.
- Neutral Frying Oil: Something with a high smoke point, like California avocado oil. It won’t interfere with the flavor.
- Unsalted Butter: Adds that rich, nutty, glossy finish. You can definitely use vegan butter to keep it plant-based.
- Fresh Rosemary: One sprig infuses the butter with an amazing woodsy aroma.
- Meyer Lemon: The bright, slightly sweet acidity cuts through all the savory goodness perfectly.
Optional Asian Twist
Craving something different? If you want to take these in an Asian sauteed oyster mushrooms direction, skip the rosemary and lemon. Instead, after the mushrooms are golden, add a splash of low-sodium soy sauce, a drizzle of toasted sesame oil, and a little grated ginger. Toss it all together for the last minute. It’s a completely different but equally delicious flavor profile.
How to Make Crispy Sauteed Oyster Mushrooms
This is a 20-minute recipe, not a science project. Breathe. As long as you remember two things, high heat and patience, you’re going to nail it. Let’s walk through the four stages.
Stage 1: Prep and Heat the Pan
First, get your mise en place ready. Have your cleaned mushrooms on a plate lined with paper towels. You’ll also want another paper towel-lined plate sitting nearby for the finished batches.
Now, heat a large stainless steel skillet over medium-high heat. Add enough neutral oil to coat the bottom, similar to a light film. You want to wait until the oil starts to shimmer. That’s your cue that the pan is ready for action.

Stage 2: Sear the Mushrooms
Carefully place the mushrooms into the hot pan in a single, even layer. This is where the crowding rule comes in. If you pile them in, they’ll drop the pan’s temperature and start releasing water instead of browning. Work in batches if you need to, I often do.
This next part is the hardest part for everyone: Leave them completely alone for at least 2 minutes. I promise, they’re not burning. They’re building a crust.

After 2 minutes, use your tongs to lift one up and check the color. If it’s deeply golden brown and crispy on the edges, flip the rest. Cook for another 2 to 3 minutes on the second side. Transfer the crispy sauteed mushrooms to your paper towel-lined plate and season generously with kosher salt and freshly ground black pepper.
Stage 3: Finish with Rosemary Butter
Here’s where the magic happens. Wipe the skillet clean to get rid of any burnt bits, then set it back over medium-low heat. Add your unsalted butter and the sprig of fresh rosemary.

Once the butter has melted and started to foam slightly, return all the mushrooms to the skillet. Toss them gently for 1 to 2 minutes until they are absolutely glossy and completely coated in that aromatic rosemary butter. The smell at this stage is frankly intoxicating.
Stage 4: Season and Serve
Take the skillet off the heat. Give the mushrooms one final pinch of salt and pepper, then transfer them to your serving plate.

This is the moment for that gorgeous Meyer lemon. Give the whole dish a generous squeeze of fresh lemon juice right before you bring it to the table. That burst of brightness makes all the rich, savory flavors sing.
Serving Suggestions
These umami mushroom side dishes are seriously versatile. Honestly? They often end up outshining the main event on my dinner plate.
- Over a steak or chicken: Pile them high on top of a grilled ribeye or seared chicken breast.
- Tossed with pasta: Stir them into hot pasta with a little pasta water and parmesan.
- On pizza: They add a meaty, savory layer that vegetarians will love.
- In sandwiches: Layer them onto a crusty baguette as a filling lunch.
- With rice or polenta: Serve them over a bed of fluffy rice, creamy polenta, or even scrambled eggs for a fantastic brunch.
- Avocado toast: Slap them on top of smashed avocado toast for a next-level breakfast.
Pick your favorite. You truly can’t go wrong with any of these ideas.

Storage and Reheating Leftovers
I’m not going to judge you if you eat the whole batch straight from the pan. I do it all the time. But if you actually manage to have leftovers, here’s how to keep them tasting great.
Transfer the sauteed oyster mushrooms to an airtight container and pop them in the fridge. They’ll stay good for about 3 to 5 days. The texture will soften a bit, but the flavor will still be amazing.
To reheat, I strongly recommend using a skillet over medium heat rather than the microwave. Trust me, it does a much better job of reviving some of that crispy texture. Just warm them through until they’re hot, and give them a tiny fresh squeeze of lemon.
Leftovers are also incredible chopped up and folded into an omelet or frittata the next morning.
Recipe FAQs
This healthy mushroom recipe is about to become your new favorite quick weeknight side dish. It’s simple, it’s fast, and it turns an intimidating ingredient into something you’ll crave constantly.
When you make these, and you will make them, they’ll disappear before you can even take a picture of them, no really. Don’t forget to save this recipe to your Pinterest board so you have it ready for your next farmers market haul.
Now go get your pan hot. You’ve got this.
Source: Learn More About This Dish